![]() Send File to Get Quote
Send File to Get Quote ![]() This email address is being protected from spambots. You need JavaScript enabled to view it.
This email address is being protected from spambots. You need JavaScript enabled to view it.
Are you looking for cost-effective & reliable service? Get Started
Vector Conversion Artist and Fine Art Tutor
I will be writing on vector illustration, vector art, graphic art, cartoon, tracing, clipping path, vector graphic, image retouching and all graphic related topics.
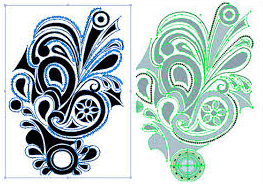
Convert Raster Images into Vector Graphic
In the modern graphic era, digital images are divided into two basic type i.e. raster images and vector images. In a very laymen language, you can say raster images are the composition of the connected dots and vector images are the composition of the connected lines.
Now what is a raster image?
A raster image is a collection of the dots termed as pixels. Every pixel is a small colored square. For instance, when you scan an image, the image is converted into a collection of pixels termed as raster image. PDFs, JPEGs, GIFs, PNGs are the most common forms of raster image.
What is a vector image?
A vector image is a collection of connected lines and curves which yields an object. In other terms, whenever we create a vector image using an Adobe illustrator program or any other editing software, we create nodes or drawing points. Using curves and lines, we connect these nodes to get an object. EPSs, CDR, WMF, AI, SVG are the most common forms of the vector images.
Why there is a requirement of raster to vector conversion
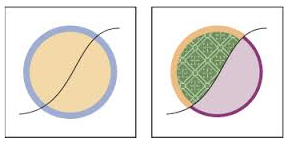
In the raster images, the resolution is expressed in the terms of dots per inch. So if we increase the size of the image, the size of the each pixel also increases which leads to the infusion of jaggy edges in your image. In other words, you can say that the quality of the image degrades and therefore you cannot use image at different places.
While on the other hand, the resolution in vector images are calculated on the mathematical formulas.so they can be scaled up to any size without any loss in the quality of the image. As the vector images are composed of objects, so you can also change the color of the individual objects.
Note: While comparing the resolution of the image, the size of the vector images are very less than raster images
Live Trace: Simple Way for Raster to Vector Conversion
There are applications like Adobe streamline and soft’s Silhoutte which have a great capability to perform raster to vector conversion but Live Trace feature of the Adobe illustrator is far ahead. Live Trace follows the two steps process. In first step, it make adjustments like contrast, blurring of edges etc to the raster image. In the next step, it draws vector path to create an accurate vector image.
To do conversion, kindly follow steps
- Select raster image which you want to convert to vector
- Click the Live Trace button in the control panel or select Object->Live Trace->Make. It traces the image with the default trace preset of the Illustrator. You can also the 14 tracing presets as per your desired results.
- Once your image is traced, a live link is maintained to the raster image. You can also modify the tracing settings accordingly as per your requirement.
You cannot edit the vector paths which were created during the tracing till the Adobe illustrator maintains the live link to the raster image. To do so, you either have to expand the object which is traced or convert it into a live paint group.
Expand Live Trace Object
After selecting Live trace Object, choose Object->Live Trace -> Expand. Now use the Direct Selection Tool to edit the anchor points. At this instance, the object which is traced is not linked to original raster image and the adjustment of traced results with any of Live Trace Option is not possible.
Conversion to Live Paint Groups
Adobe Illustrator allows you to fill attributes to semi or fully enclosed areas. This step expands the traced object and transform all the vector objects into a Live Paint Group. To convert object into live paint group, just select the object and click the Live Paint Button from the control panel.
Once you have finished tracing of an image, Adobe illustrator allows you to see the results. When you select a traced image, the control panel updates two icons
- Raster Image Preview Setting
- Vector Result Preview Setting
You can use any of the following four settings to preview original raster image
- No Image
- Original Image
- Adjusted Image
- Transparent Image
You can also use settings to view the traced vector results
- No Tracing Result
- Tracing Result
- Outlines
- Outlines with Tracing
Note: For the better performance, it is advisable to turn Gap Detection on manual option.

company
services
LEARNING DESK
follow us
Stay up-to-date with the all information on our services. We'll keep you in the loop.


Support
We are known for delivering quality services to our customers in a short turnaround time, can be contacted at
![]() This email address is being protected from spambots. You need JavaScript enabled to view it.
This email address is being protected from spambots. You need JavaScript enabled to view it.
© 2015 VectorzMedia.com. All Rights Reserved.