So, you need a digital vector file of a logo but what you have is a printed logo. You can convert it to a CDR file. In case you have already faced this situation, you may know that manual vectorization takes very long time. Taking physical images and converting them to digital vector format is something that requires several hours and the expertise to use vectorization tools. CorelDRAW Graphic Suite is a powerful tool to perform this work easily and shortly. In this tutorial, we will learn to convert pixels to shapes. i.e. raster graphics to vector images. This tutorial is prepared for CorelDRAW Graphic Suite X7 and higher versions.

Image Source
An Overview of Vectorization through PowerTRACE
In case you are tracing an image for the very first time, it's good to have some information for achieving good results. When you have selected a bitmap based image in CorelDRAW, you can access PowerTRACE through property bar's Trace Bitmap command. In the Trace Bitmap list box, you can find Quick Trace which can be used for tracing images quickly, that too without any need to open PowerTRACE dialogue box.
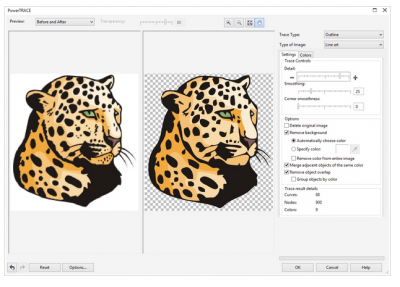
Also, you can use the PowerTRACE dialogue box to change settings. You can select from 6 modes as per your tracing needs. The dialogue box has two areas. The right side has two options and the left side shows a preview of the image being edited. At the top of the box, you can see viewing and zooming tools while the bottom has Reset, Undo, and Redo buttons.
PowerTRACE may seem familiar to you if you have used bitmap filter effects in applications like Corel PHOTO-PAINT or CorelDRAW. The setting tab holds many important areas like trace options and trace controls.
Here We Start Vectorization
-
Open a new CorelDRAW document and import the bitmap image that needs to be vectorized.
-
Click property bar's Trace Bitmap button and select Outline Trace>Logo. On this, a PowerTRACE dialogue box will open and produce an initial trace of the raster image.
-
The Detail and Smoothing sliders are automatically set. You can find these sliders in the settings tab. You can also see the before and after results of the tracing in the preview window. Also, there's a trace result details area that indicates how many curves, nodes, and colors are there.
-
In case, the background of the logo is white, the application will remove it automatically. You can also eliminate the white color in the interior by enabling check box saying 'Remove color from entire image'.
-
In order to check the accuracy, select Wireframe Overlay in the Preview list box. You can zoom in or zoom out with single left and right clicks. You can also make use of the Transparency slider for adjusting the original image's transparency.
-
For examining the color results, you need to click the Colors tab. Then open the Color Mode list box and select CMYK. Now specify the colors as PANTONE spot ink colors.
-
Now click the first color in the list and open the Select Color dialogue box by clicking Edit. From this dialogue box, you can choose the PANTONE solid coated, and then you will see that the CMYK value is selected automatically. You need to repeat the process for all colors.
-
And your vector logo is complete. You can save it and delete the bitmap file if required.
Raster to vector conversion is not very difficult but it needs a meticulous approach, especially when the image is to be used for commercial purposes. That's why logos should be traced very carefully. The slightest of mistakes can ruin all the efforts and time invested.