![]() Send File to Get Quote
Send File to Get Quote ![]() This email address is being protected from spambots. You need JavaScript enabled to view it.
This email address is being protected from spambots. You need JavaScript enabled to view it.
Are you looking for cost-effective & reliable service? Get Started
Vector Conversion Artist and Fine Art Tutor
I will be writing on vector illustration, vector art, graphic art, cartoon, tracing, clipping path, vector graphic, image retouching and all graphic related topics.
Efficiently Using Image Trace Feature in Adobe Illustrator
Adobe Illustrator's Image Trace feature helps to convert raster images to high-quality vector graphics quickly and accurately. Vector images can be scaled up to any size without any quality loss due to their construction that includes mathematical paths. On the other hand, raster images are made of pixels which makes images blurred, especially the edges, when scaled up. That’s the prime reason businesses prefer vector images over raster ones.
In this post, we will discuss how to convert raster images to vector graphics with the help of the Image Trace tool.
Step 1
Open the input image in Adobe Illustrator
Step 2
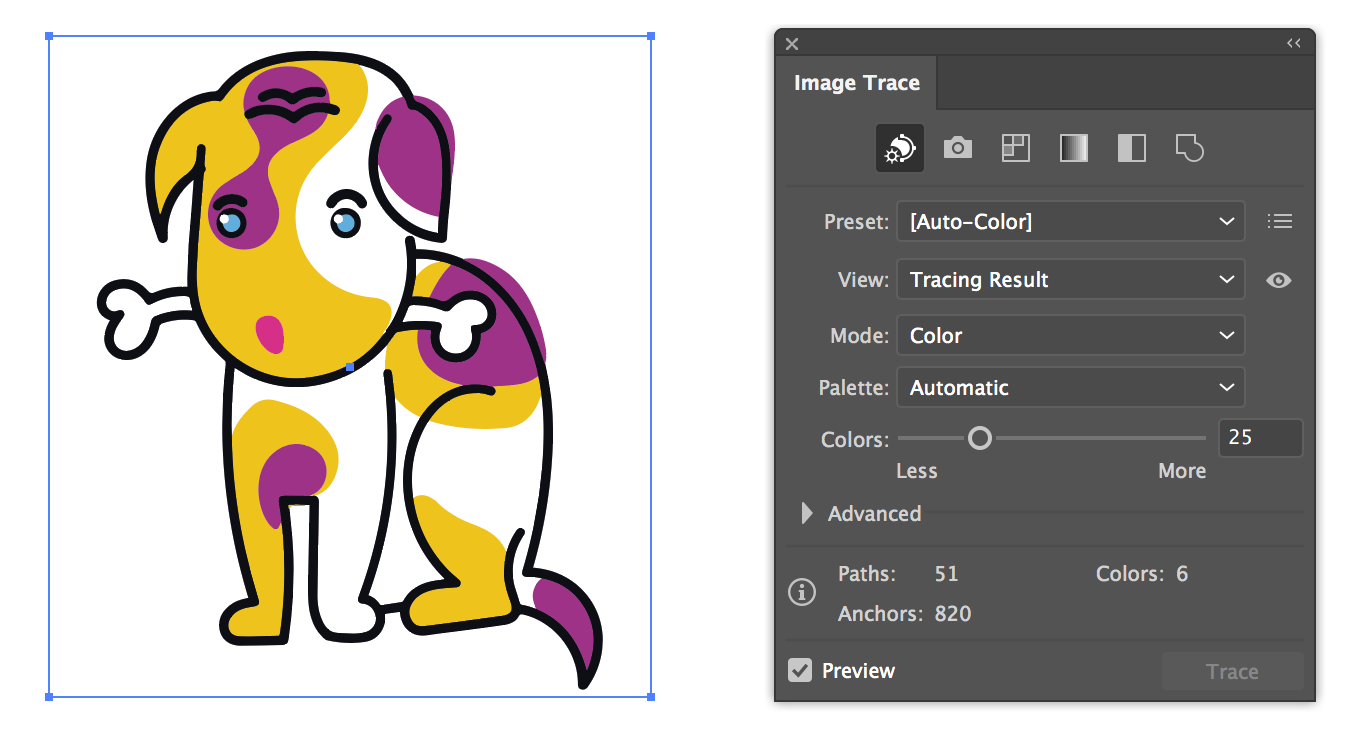
Select the Image Trace option in the Windows tab. You will see the Image Trace Panel opening.
Step 3
View your live image in vector format with the Preview box. At this stage, the vector version may look unseemly but you don’t need to worry. We will work on that in the further steps.
Step 4
Select the best suitable mode among Color, Grayscale, and Black and White from the Mode drop-down menu.
Step 5
Now, adjust the Color, Gray, or Threshold slider that changes as per the mode you have selected. But the functionality between all three sliders remains almost the same.
Colors : Maximum number is recommended for creating realistic vector graphics.
Grays : Select from a range of 0 to 100 a per the results you want.
Threshold : It converts lighter pixels to white and darker to black after selecting the threshold value.
Step 6
Get more options with the Advanced menu.
Step 7
Now, you have to set the number of paths in the slider. You need fewer paths for a simple design. But adjusting too few paths can cause your graphic to look boxy and eventually, it will ruin the overall look. However, more than the required paths are also not recommended. Setting excessive paths can make the edges of the image look rough. The number of paths required depends on the image itself and you need to decide carefully.
Step 8
Then, start adjusting the Corner slider to attain the required sharpness in the image. Fewer corners will provide more roundedness to the design while more corners will add to the sharpness. Now, adjust as per the level of sharpness you want in the design.
Step 9
Now, you have to eliminate excessive noise from the image. The noise slider is there to tell the software to ignore those areas in the image that fit within the set pixel amount. Higher the pixel amount, lower the noise. If there are any parts in the image that you don't want in the output image, this slider can be of great help in removing them. But it can also delete parts to be retained if they are smaller. Hence, you need to set a pixel amount that helps you retain the important parts and gt rid of the useless ones.
Step 10
The last step is to save your graphic in any vector format such as SVG, AI, or EPS by clicking the Expand button. Your vector image is ready to be used.

company
services
LEARNING DESK
follow us
Stay up-to-date with the all information on our services. We'll keep you in the loop.


Support
We are known for delivering quality services to our customers in a short turnaround time, can be contacted at
![]() This email address is being protected from spambots. You need JavaScript enabled to view it.
This email address is being protected from spambots. You need JavaScript enabled to view it.
© 2015 VectorzMedia.com. All Rights Reserved.